Thinking about a DIY garage door project? A self-install is achievable for homeowners who are DIY enthusiasts but the difficulty level is between moderate to difficult because of measuring, drilling fixing holes and moving heavy components. But fear not, we’ve got you covered. This detailed, informative guide sets out what tools are required, what safety precautions to take and how to measure for a new garage door, the timeframes required, and costs so that you can plan and execute the job successfully. It’s all about taking it at your own pace.
After 25 years of installations across Norfolk and Suffolk, the TWF doors has seen first-timers succeed when they plan thoroughly, measure twice, and select the right colour of the garage door, the top box and guide runners.
What you’ll learn in this guide
This practical walkthrough answers common UK questions, including:
- Tools required for DIY garage door installation and a full checklist
- How to measure for a new garage door, plus headroom, sideroom, and backroom
- How to frame a garage door opening and prepare the site
- Step-by-step paths for self-install replacement and new door fitting
- DIY garage door safety precautions and the most common mistakes to avoid
- DIY vs professional garage door installation cost in the UK and time estimates
- Best DIY garage door kits for beginners and the easiest type to install yourself
- Troubleshooting a DIY garage door that will not close, sensors, and balance checks
- Whether you need a permit or building regulations approval
Should you really fit a garage door yourself?
Attempt a self-install only if you:
- Know how to use spirit measures, tape measures to take measurements.
- Are comfortable in wiring the garage door (full instructions provided after purchase)
- Are confident with ladders and power tools and can follow instructions
- Have a reliable helper and a clear workspace
- Can manage heavy lifting and overhead work without rushing safety steps
Important safety note: Keep children and pets away from the area.
Time, tools and money
Before pulling off the old door, check that your tool kit matches the task. Minimum essentials include:
- A reliable 1200-mm spirit level, two step ladders, clamps and a sturdy drill or driver
- A tape measure you trust, saws only if framing will be adjusted
DIY kits for a single insulated roller door typically range from £485 and above depending on finish and insulation. Labour savings are real, though you must factor extra time to troubleshoot and correct small alignment errors. Paying a professional usually adds £300 to £700 and often bundles disposal and warranty support. For homeowners in Norfolk or Suffolk who decide the risk and time are not worth it, TWF can survey and quote fitting through the free survey service.
If you are planning a self-build or replacement and want to price options, the garage door planner helps DIY customers configure sizes, colour and control options without guesswork.
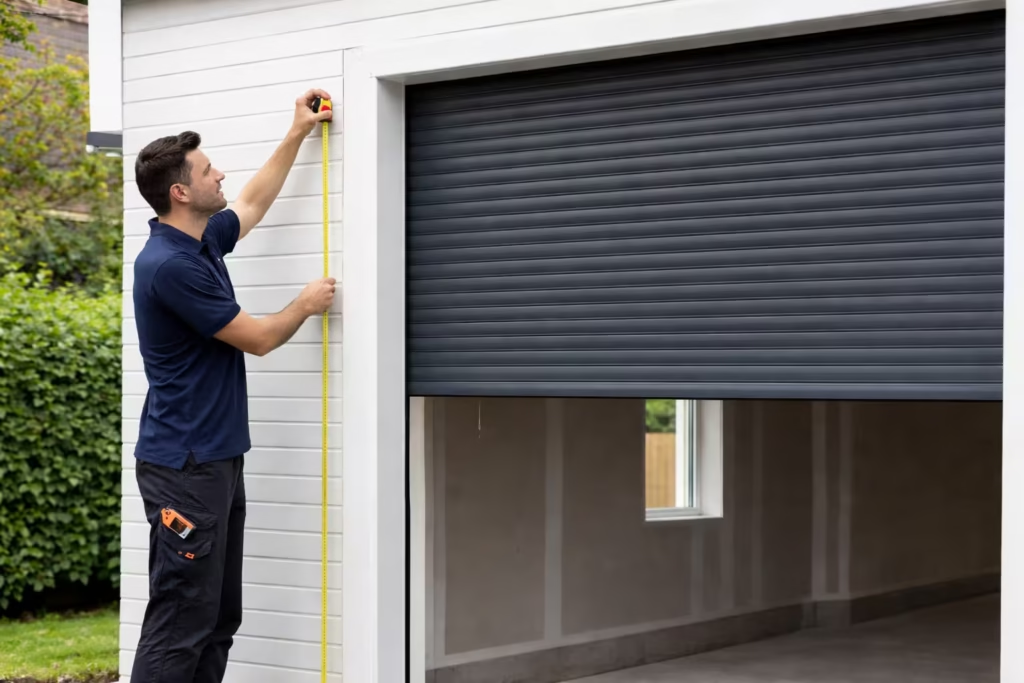
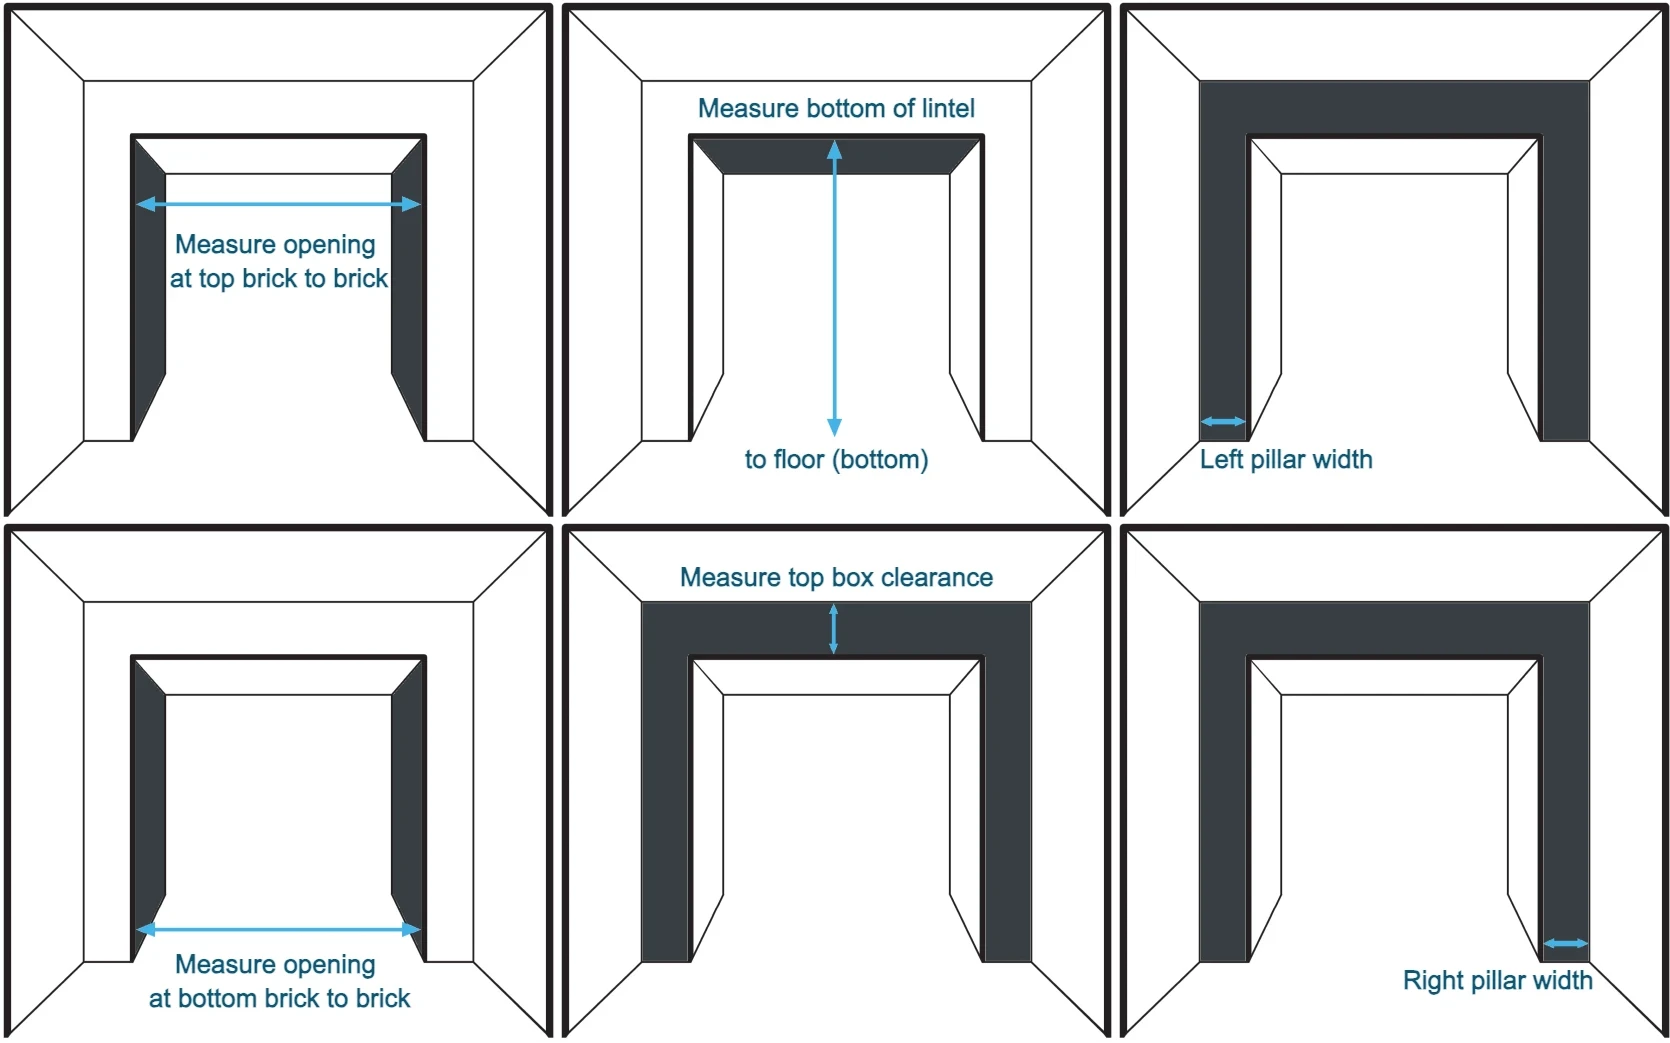
Measure like a pro: width, headroom, sideroom, backroom
Accurate measuring is the foundation of a successful fit. Measure width and height at two points each, then bottom of linter to floor, top box clearance and both pillar widths.
Meet the parts you’ll handle
Understanding the parts helps you diagnose issues quickly:
- Sections or panels that form the door curtain
- Vertical and horizontal tracks with brackets and angle
- Rollers, hinges and struts that add stiffness to wide sections
- Manual or automated openers such as chain, belt or direct drive units
If you plan to motorise a roller or sectional later, TWF supplies compatible control gear through the shop. Popular items include the Teleco control panel with two controls, safety edges such as the Light Guard, 50nm tubular motors and 80nm tubular motors.
Pick the door and kit that suit you
Wooden doors look superb on period homes and yet they are heavy and require more upkeep. Aluminium doors are lighter, resilient and widely supplied in kits that are simpler to assemble. For cold garages or attached homes, look for polyurethane insulation with high thermal performance. An R-value of 16 or higher is a sound target in colder regions, with polystyrene offering a decent mid-range option.
Skills checklist: are you ready?
After hundreds of installations across (across Norfolk and Suffolk), the TWF team have learned the traits that generally predict a successful DIY self-installation:
- Ability to read a layout diagram and translate it to the opening accurately
- Confidence aligning tracks so they are parallel
- Installing it at your own pace
A recent Ipswich replacement illustrated this well. The homeowner laid out every hinge, roller and bracket by section, dry-fitted the base panel to confirm level, then worked steadily with a helper. The result needed only minor track tweaks before final balance.
When things wobble: quick fixes that work
Common DIY pitfalls include openings not correctly measured, uneven level base sections and getting the wrong colour that doesn’t match the surrounding walls or property. If a newly hung door will not close, one thing to bear in mind is that these issues often come down to safety sensor alignment and travel limit settings. Please do get in touch if you ever need any help at this stage.
If you discover missing control gear or need an external manual override for peace of mind, TWF stocks compatible accessories including manual override, upgraded autolocks plus replacement fobs and eurokit remote fob for popular control systems.
Know when to call it and hand off to a professional
There are clear red flags. A crooked or cracked lintel or any situation where the door cannot be balanced are some of the signs that you should get help. At that point, a qualified installer will resolve the fault quickly and safely.
Pro tips that save hours (and headaches)
Set up your workspace
Beyond the usual hand tools, the tools required for DIY garage door installation should ideally include a long spirit level. Organise two staging zones – one for stacking panels flat on padded trestles, one for assembling tracks.
Small tweaks, big difference
- Base panel set and seal
- Dry fit the bottom section with the rubber threshold seal lightly compressed, not crushed. Use two opposing clamps to hold it while you verify an equal reveal to the uprights. We often set a 3-5 mm side gap to prevent rub when the building moves with temperature.
- Building the stack
- Pre-hang rollers on the next section, then hinge the joint loosely so the panels can float while you true the tracks. Do not drive hinge screws hard until both tracks are perpendicular to the horizon (also known as plumb).
- Track alignment
- Plumb the vertical track with a long level, then set the horizontal run with a 5 to 10 mm fall back towards the rear to keep the door seated when open. Track spacing should match the panel thickness plus manufacturer’s clearance – too tight gives chatter, too loose gives rattle.
Lessons from our installation experience
- Coastal corrosion
- A recent installation in Lowestoft showed how sea air dulls cheap hardware within months. Specify marine-grade seals and stainless fixings near the shore, and consider powder-coated tracks to reduce surface rust.
- Wind exposure
- In Great Yarmouth and along open fen edges near King’s Lynn, gusts load the curtain or panels. Heavier-gauge struts across the top section and correct track bracing stop flex that can cause a door to pop out of the rollers.
- Uneven floors
- Many pre-war garages around Norwich have cambered concrete (intentional upward curve to counteract the downward deflection from its own weight and other loads).
Avoid these pitfalls (we see them all the time)
- Skipping diagonal measurements when framing
- Over-tightening hinge screws before tracks are trued
- Failing to lock out the opener during setup
- Mounting horizontal tracks without rear hangers triangulated to the ceiling joists
- Ignoring floor falls that create a permanent light gap under the seal
Master measuring lead to fewer surprises on day of installation
Record width and height at three points each, headroom and sideroom both sides, and backroom to the nearest obstruction. Photograph the opening, ceiling joists and any pipework that could obstruct horizontal tracks. TWF’s site forms also include motor clearance lines for later automation, which avoids a second round of bracket moves.
Time & manpower: plan your installation like a project
First-timers often benefit from splitting the work across two sessions – day one for removal, framing corrections and base section setting, day two for stacking, tracks, cables and balancing. Two competent pairs of hands are safer than one, especially when guiding the first horizontal track into place. If you are asking how long does it take to install a garage door DIY, allow a full day for a single door plus extra time for final adjustments and opener setup.
Which system fits your home – and your skills?
If you want the simplest self-fit, a light single-width steel sectional with extension springs is usually kinder to work with than a heavy timber model. Many homeowners also look at roller shutter garage solutions for compact headroom and cleaner ceiling space. For pre-packed kits that ship with clear manuals and safety features, TWF can guidance on how to select the right sized DIY garage door and help you design finishes through the garage door builder.
Permits and Building Regulations
Older garages sometimes need new posts or a fresh lintel. If that structural work is required, check local guidance with your council and follow the building regulations. If you are wondering do I need a permit to replace my garage door, like-for-like swaps rarely need planning consent, but structural alteration triggers compliance checks, and Housing Association rules can add conditions.
Finishing touches that feel factory-fitted
- Consider weather seals if you live near the coast
- Fit side and top seals after final balance, then re-check closing force.
- A bonded rubber threshold helps keep floodwater out in coastal towns. Degrease and dry the slab before adhesion.
- Hardware and spares
- Keep a spare roller and hinge screws if possible. If anything gets damaged, grab replacements from the shop.
- Motors
- If converting to automated later, review our tubular motors.
Conclusion
After two and a half decades of experience, we have found that completing a DIY garage door project is a genuine achievement, yet it only delivers long term success when measurements are exact, components are aligned, and a helper is at hand with work spread across an achievable timeline at your comfort level. The evidence shows that patience, the right tools, and a reliable helper are non negotiable, especially when working overhead with heavy sections. The TWF 55mm door can weigh 35kg and the TWF 77mm door can weigh up to 80kg (definitely recommend getting a helper).
The approach TWF recommends is clear: confirm headroom, sideroom, topbox and lintel space before you buy, follow the kit manual step by step, and do not take shortcuts when carrying out balance checks or safety devices. Also remember that the door’s warranty will stay intact if you seek expert help early on, not to mention protecting your safety.
If you feel that you’re ready to design your ideal door, take a look at our online door designer. Want a professional opinion and a fixed plan for your home in Norfolk or Suffolk? Book a free survey. Need parts or extras to finish the job properly? Browse the TWF online shop.
Frequently Asked Questions
Can you install a garage door by yourself?
Yes, if you feel competent and prepared. Budget a full day (around 6-10 hours) for a single door, have the correct tools (including proper winding bars), and enlist at least one strong helper-garage doors can weigh from 35kg (55mm doors) up to 80 kg (77mm doors) depending on type.
Should you install a garage door on your own?
For most homeowners, it’s generally not recommended if you don’t have someone to help you. Heavy lifting, accurate measurement and setting the door can be challenging for a complete beginner. Do consider if a professional fit is more suitable as it provides you with safety, speed, correct balancing, and warranty support – often saving money over DIY fixes later.
What’s the average labour cost to install a garage door opener?
Installers typically charge a call-out/hourly rate and the job takes 2-6 hours depending on wiring, brackets, and door type. Expect labour to be at around £300 or more; ask for a fixed quote if extra setup or smart controls are needed.
Can you fit a new door onto old tracks?
Best practice is no. Each door is engineered to its own tracks and hardware. Re-using worn or mismatched tracks accelerates wear, creates noisy/binding travel, and can shorten the life of the new door – or compromise safety.
Do I need planning permission to replace a garage door?
A like-for-like replacement is usually Permitted Development and needs no planning permission. If you alter the opening, structure, or you’re in a listed building/conservation area, check local rules – and remember building regulations may apply to structural changes.
How long does installation take?
A first-time DIYer should allow 6-10 hours for a single sectional door (longer for double/insulated setups or if adding an opener). An experienced fitter will often complete a straightforward replacement in 3-6 hours.
Is it cheaper to install a garage door opener yourself?
Usually, yes as you’ll save the labour cost. But factor in your time, correct alignment, safety testing, and potential warranty implications. If you’re confident with wiring, mounting, and setup, DIY can be a sensible saving; otherwise hire it out and avoid callbacks.